Sinks are the most crucial part of your kitchen space. There is no doubt about this fact. However even if you own a great sink, there might be problems and issues coming your way.
Some parts will get broken, sometimes draining will trouble you then again spots can be a regular issue. No matter what, you need proper solutions.
One common problem with the kitchen sink is leakage. Most of the time, only solution to leak is replacing its strainer. Of course, you need to be sure the source of leaks is actually strainer. For example, sometimes we ignore leakages on a pipe.
However, if the problem is within drain and sink joint, it’s definitely strainer. Let’s know about an easy method on how to replace kitchen sink strainer all by yourself.
Detaching Strainer from The Sink!
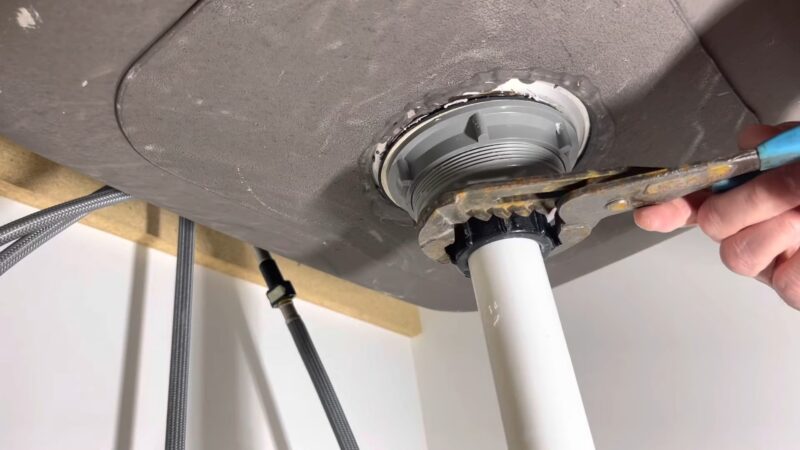
To replace your strainer, you need to get rid of the old one first. Start with simply detaching the pipes. These pipes are usually connected to your existing strainer. You would be able to see some slip nuts on the drain fittings. Use a simple channel-pipe plier to easily detach these. Now you can use the tailpiece of your sink and pull out drain’s trap that is visible.
Be really careful while doing this step. It’s usually quite complicating. Particularly for people who have never replaced such parts of a sink.
Sometimes the nut stays corroded with the sink’s tailpiece. At that moment you can use some penetrating oil. This oil will help you to get rid of such problems.
If you still can’t solve the problem then only one option is left. It would be best if you cut the nut out. Now it should be possible to detach the existing strainer.
Just use gentle force and pull the strainer out. It will gradually come out of the sink’s top. Sometimes prying can help you out. Especially when dealing with old plumber’s putty and breaking seals.
Get the Drain & Strainer Ready!
Use some wet cloth and simply wipe down the area around your sink opening. Make sure there is no dirt nor debris existing. It’s really important to neat it up before installing new strainer.
Sometimes the old strainer leaves build up. However, most of the time, these build up are easily ridable with obvious cleaning steps that you usually follow.
You need to get the basket strainer. Simply separate its different part. Make sure to spread them well so that you can easily reach each part. Use a tool to loosen retainer’s screws.
Spreading Plumber’s Putty!
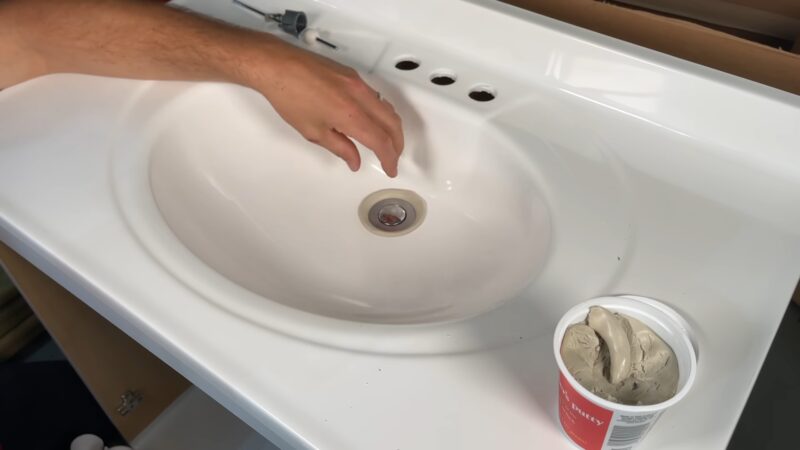
You need some plumbers putty for this step. Use a uniform width plumbers putty rope. Now simply figure out the area around strainer’s base. It should be below the lip. Simply apply the putty around it. Wrap it well enough and makesure no area is missed.
Now get your new sink strainer. Set it up on the opening of your sink drain. You need to be really cautious while centering it. There should be proper aligning when setting it up. Gently use some force to push the strainer into putty. This will help it adhere to the sink easily.
Locking the Whole Set Up
Now you need to again deal with sink’s underside. Place your flexible washer on it. Now grab the metal washer of your sink. Put it right over the sink strainer’s body. Make sure they stay in place.
Now you need to do some threading on retainer. Make sure to thread them well before tightening the screws. Next, simply use your hand to tighten the nuts. The need to be firm enough to not get loosened.
If you are not sure about the tightening, use a screwdriver or plier. This will help you to ensure a firm lock of screws.
Now, be certain you don’t tighten it too much. It needs some space so that the rubber washer avoids any squeezes. Sometimes that’s what happens with sink strainer when nuts are too locked.
However, if you cannot ignore the situation and washer squeezes out get some putty. Use this extra putty on the sink’s metal washer top. This will solve the problem in no time hopefully.
Fixing Drain Pipes Back!
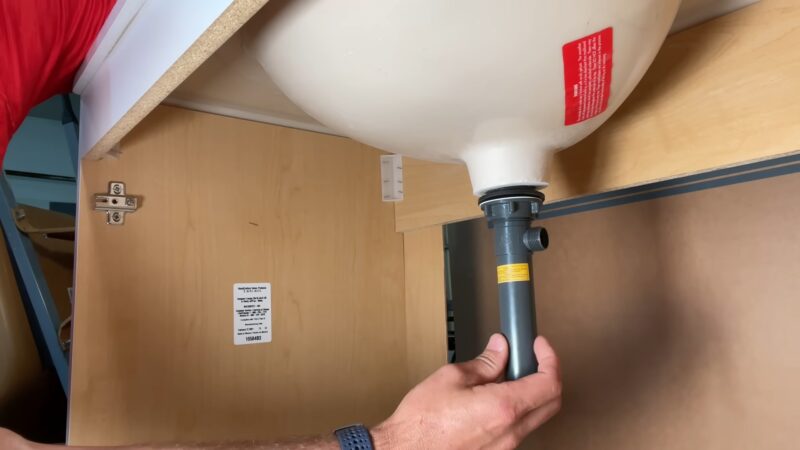
Now it’s time to reassemble everything that you detached for the replacement. It should not take much time and you’ll be finishing off. It’s actually quite simple and follows an easy rule.
Reinstall everything at the exact opposite order of detaching them. You should make sure you follow the order otherwise wrong attachments are going to occur.
Once you are done, check for leaks. Simply turn on the water. If there is no water spilling from the wrong places, congrats! The replacement was well-off.
One important note: To be really sure about no leakage do a simple test. Block down the drain. Now simply fill the entire sink with water. Now release the stopper.
This time if there are still no leaks then you can be completely confirmed about the replacement. Most of the time, the extra pressure of running water through a drain can reveal leaks instantly. Use this simple trick any time to be sure about any existing leakage even after a few days.
FAQs
How do I remove the old kitchen sink strainer?
Start by detaching the pipes connected to the existing strainer, using a channel-pipe plier to loosen slip nuts. If the nut is corroded, apply penetrating oil or cut it out if necessary. Carefully pull the strainer out, using gentle force or prying if needed.
How do I prepare for installing the new kitchen sink strainer?
Before installing the new strainer, ensure the sink opening is clean and free of debris. Use a wet cloth to wipe down the area and remove any build-up from the previous strainer.
How do I install the new kitchen sink strainer?
Apply plumbers putty around the base of the new strainer, ensuring it is below the lip. Center the strainer over the sink drain opening and push it into the putty. Place a flexible washer on the sink’s underside, followed by the metal washer. Thread and tighten the retainer screws using your hand, a screwdriver, or plier, being careful not to overtighten.
What should I do if there are leaks after replacing the kitchen sink strainer?
If leaks occur, check the tightness of the screws and ensure the rubber washer is not overly compressed. If necessary, apply additional putty on top of the sink’s metal washer to create a better seal. Perform a water test by blocking the drain, filling the sink with water, and releasing the stopper to check for any leaks.
Can I replace a kitchen sink strainer by myself?
Yes, replacing a kitchen sink strainer can be done by yourself if you have basic plumbing skills and the necessary tools. However, if you are unsure or uncomfortable with the process, it’s recommended to seek professional assistance.
Can I use any type of plumbers putty for installing a kitchen sink strainer?
It is recommended to use a plumbers putty specifically designed for sink installations. This type of putty is typically non-staining, easy to work with, and provides a reliable seal. Read the manufacturer’s instructions to ensure compatibility with your specific sink and strainer.
Are there different sizes of kitchen sink strainers available?
Yes, kitchen sink strainers come in various sizes to accommodate different sink openings. Before purchasing a new strainer, measure the diameter of your sink drain to ensure you select the correct size for a proper fit.
Can I replace a kitchen sink strainer without removing the entire sink?
In most cases, it is possible to replace a kitchen sink strainer without removing the entire sink. The process involves accessing the strainer from underneath the sink and detaching the necessary components. However, if the strainer is severely damaged or if the sink is in need of repair, removing the sink may be necessary for a complete replacement.
Verdict
Imagine one day when you have to live without your kitchen sink. Isn’t it scary and really uncomfortable? That’s how much importance your kitchen sink holds in regular life.
Daily basis tasks are almost paralyzed in the absence of a soundly functioning kitchen sink. So, when you get a new strainer, be sure to have it from a quality place. You need an essential part to bring your kitchen sink back to life. Don’t treat it poorly with wrong parts and improper replacing methods. Good Luck!