There are tons of sample jet burners on the internet. However, the thing that lacks in most of them is a design for a single propane burner that is not only small but also powerful enough to provide an estimated ninety thousand BTUs. Well, you are in luck today as we are about to go into detail as to how you can quickly build such a burner from the comfort of your home, using a few locally available materials. Get ready!
You can use a propane single burner for a range of things including but not limited to boiling water to deep frying various foods, thanks to its ability to heat things quite fast.
Once you have everything in place, it is important to note that you will need some welding. You could opt to braze it instead. Or if there is a welding shop in your area, you could ask them to weld everything in place once the build is ready. It’s not a big task and should only take about five minutes of your time.
As is the thing with everything, creativity can help you avoid the welding process altogether. Thus, if you are okay with strapping everything in place once you make the fittings, this method will work just as well.
Why make a burner when you could quickly get one from a store? Well, most of the propane jet burners on the market do not have the type of focus flame that you can get from this design. The BTUs alone are enough to blow your mind.
Now, before we get into the assembly, it is important to remember that we are dealing with highly flammable materials. As such, it is not advisable to attempt the construction and operation of this burner if you are in doubt or if you have not handled propane in the past. When done right, you will save lots of money and get things heated in a jiffy.
If not, you could not only harm yourself, but the injuries could be fatal. Also, ensure that you use protective gear when working on the burner and where you are in doubt, discontinue the process immediately. One last thing, do not attempt to operate this burner in closed spaces. Having read the disclaimer, we can head on to the construction process.
What do you need?
The materials are as follows: PTFE tape, a half-inch steel pipe, a half-inch ball valve that works with propane, a half steel pipe high-pressure propane regulator, fittings for the flow of propane to the burner and a three-inch OD * six-inch Schedule 40 steel pipe.
You can make some substitutions for some of the materials. For the propane regulator, you could go with the 3-5 PSI regulator. For the PTFE tape, you can use pipe dope. For the ball valve, you could as well use a half-inch steel cup, (1/2 to 3/8) inch reducer bushing. Kindly note that these are the allowable substitutions and that any changes that are not in line with this can lead to devastating results.
You will require a few tools for the process which include but are not limited to a welder, a drill bit (1.2/1.3 millimeters), a drill/ drill press as well as any hand tools that could come in handy during the assembly.
The Design
Propane works in a manner such that you have to achieve a given fuel-air ratio to get it to burn. Thus, it is essential to pay attention to the size of the burner tube as well as the orifice hole as they will affect the richness or leanness of the mixture.
This burner works through the venturi effect, such that the propane gets forced out through the orifice hole at high pressure and it travels through the burner tube where it mixes with air that rushes in through the back of the tunnel. It is essential to regulate the intake of the burner to ensure that you balance the flow and the pressure.
The Build
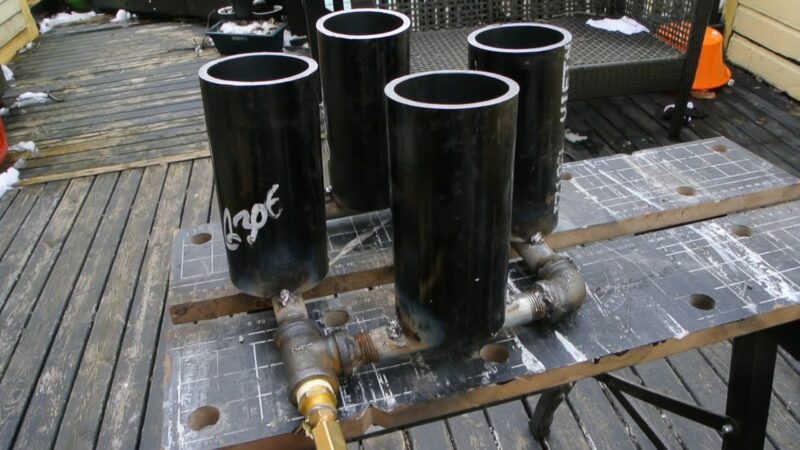
We will start with the body of the burner, which in this case comprises the half-inch steel pipe. Start by capping off one of the threaded ends. The pipe can vary in size, depending on what you would like to achieve. Now, this next step will depend on the hose as well as the propane regulator as you need to attach the pipe to the hose. For this, you will need a coupler and reducer bushing.
Making the Hole
You can drill a hole in the half-inch pipe at any location, though it should be in the middle, preferably. It helps to file the pipe in preparation as this allows for the drilling to be easy by preventing sliding. Here, you have two options as you saw in the equipment: 1.3 or 1.2 millimeters. The first option enables you to achieve a strong flame while the latter has a cleaner look. It depends on you at this point as it is a matter of preference.
Welding
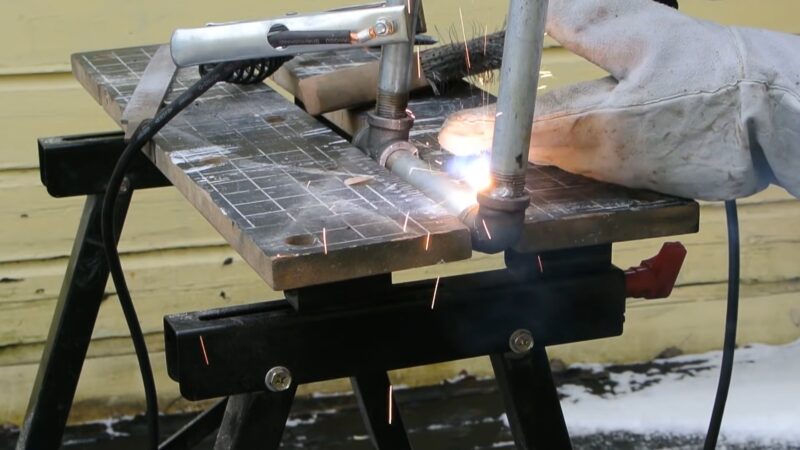
You will now weld the burner tube onto the half-inch tube, ensuring that you center it over the hole you created in the step above. You can braze it in place, or you could get some help from a mechanic shop near you. All that matters is that the tube stays in place. It is also essential to weld the feet that will support the burner, and you can do this through the use of one-inch angle steel pieces. Attach them to the burner’s body or to the place where you intend to mount the jet burner.
Connection
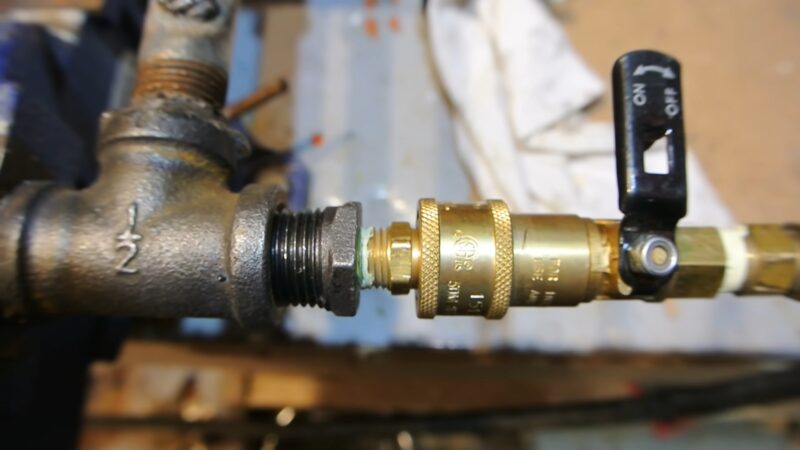
The last step is the connection of the burner to the propane, and you can go about this in many ways, as long as the plumbing is secure. You can opt to have the hose and regulator in a direct connection to the burner, or you can have a quick connect.
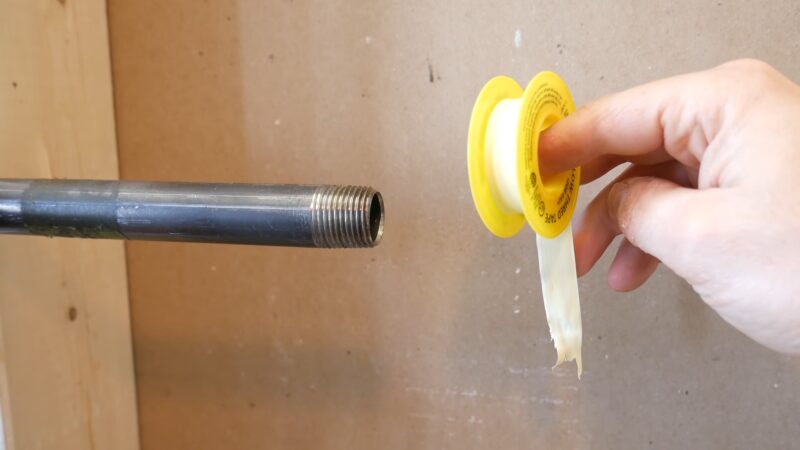
Ensure that you have a ball valve in place to regulate the flow of the gas as this will affect the size of the flame. Finish up by using the PTFE tape as this will ensure that there are no leaks, which you should test for using soapy water.
You can now assemble the burner and test it. All the best and remember to stay safe!
Discover the remarkable best 2 burner gas stoves of 2023, designed to elevate your culinary prowess and revolutionize your cooking experience.
FAQ
Why would I want to build a propane burner instead of buying one?
Building your own propane burner allows you to customize the design and achieve a specific flame focus and high BTU output that may not be readily available in store-bought options.
Is it safe to build a propane burner at home?
Working with highly flammable materials like propane requires caution and proper safety measures. If you have experience handling propane and are confident in your abilities, you can attempt the construction. However, if you are unsure or inexperienced, it is best to seek professional assistance.
What materials and tools do I need to build a propane burner?
The materials needed include PTFE tape, a half-inch steel pipe, a half-inch ball valve, a half-inch high-pressure propane regulator, fittings for propane flow, and a three-inch OD * six-inch Schedule 40 steel pipe. Tools required include a welder, drill or drill press, and various hand tools.
Can I substitute any of the materials mentioned?
There are some allowable substitutions, such as using a 3-5 PSI regulator instead of a high-pressure regulator and pipe dope instead of PTFE tape. However, it’s crucial to ensure any substitutions are compatible and safe for use.
How does the propane burner work?
The propane burner operates on the venturi effect, where propane is forced out through an orifice hole at high pressure and mixes with air rushing in through the back of the burner tube. The fuel-air ratio and flame intensity are regulated by the size of the burner tube and orifice hole.
Do I need to weld the burner components together?
Welding is typically required to secure the burner tube onto the steel pipe and attach supporting feet. However, alternative methods such as brazing or strapping the components together can be explored if welding is not feasible.
How should I connect the burner to the propane supply?
The connection can be made using a direct hose and regulator connection or a quick connect system. It’s important to ensure a secure plumbing connection and incorporate a ball valve for gas flow regulation.
Are there any safety precautions to consider?
Yes, it is crucial to prioritize safety when working with propane. Use protective gear, work in a well-ventilated area, and avoid operating the burner in enclosed spaces. Additionally, test for leaks using soapy water and address any issues promptly.
Final Words
In conclusion, building your own propane burner can be a rewarding and customizable project for those with experience and knowledge in handling propane. However, it is essential to prioritize safety and take proper precautions throughout the construction process.
By following the detailed instructions and adhering to safety guidelines, you can create a powerful and efficient propane burner that suits your specific needs. Remember to test for leaks and always prioritize safety when operating the burner. If you have any doubts or difficulties, it is recommended to seek professional assistance. Enjoy your homemade propane burner and stay safe!